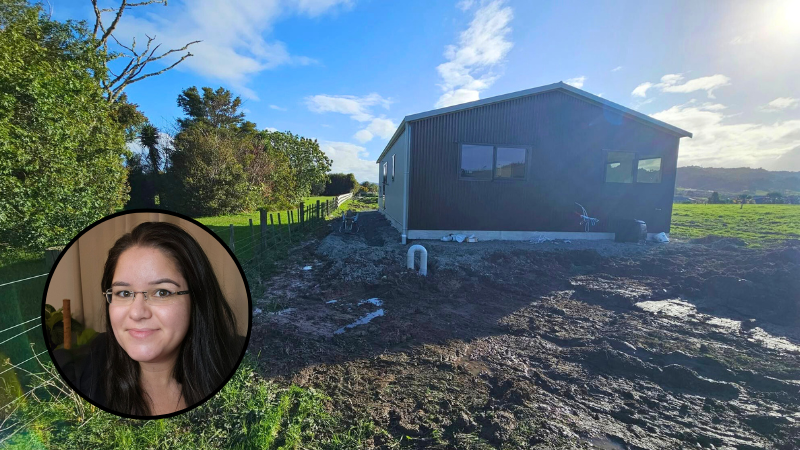
There’s a quiet kind of pressure that creeps in when you start building a house. Not always from your builder or the bank, though they’re busy enough, but from everyone else: neighbours, friends, tradies, even strangers on Facebook Marketplace.
“Only 86 square metres?”
“Aren’t you worried it’ll be too small?”
“You could always add another room…”
Where I live, most homes are 200m²-plus, with media rooms, guest bathrooms, and laundries the size of rural B&Bs. But after five years living in a 20m² house bus, I knew exactly how much space was really needed and what I didn’t need was another crushing mortgage just to prove a point.
So I stuck to my plan. Not just for simplicity, but for strategy. This wasn’t just about building a house. It was about building a future I could actually afford to enjoy.
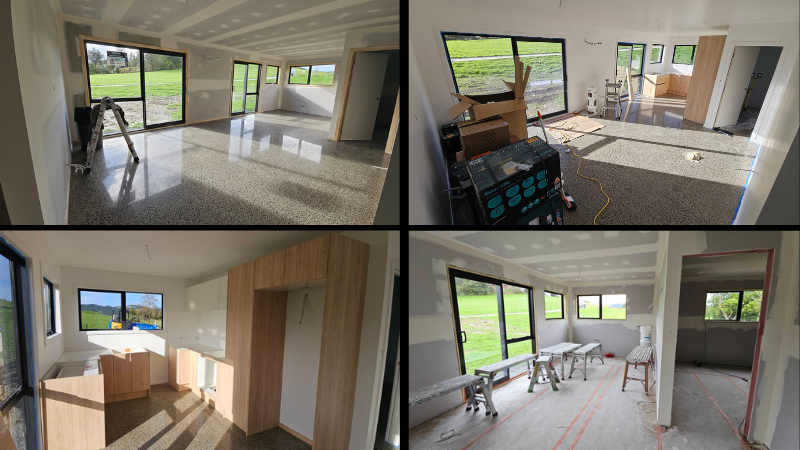
Since the last update, things have moved fast. The framing’s done. Internal walls are up. Insulation’s in, everywhere. I didn’t just insulate the exterior walls; I paid extra to soundproof all the internal ones too.
Why? Because in a compact house, you hear things. Conversations. Toilets. Late-night fridge raids. It’s fine when you’re living alone, but whether it’s a tenant, partner, or future buyer, soundproofing adds a level of comfort that’s worth it. Even the internal doors are insulated. It’s not flashy, but it makes a huge difference.
Pre-wiring and pre-plumbing are done. The heat pump’s been wired. The gib’s up, the plasterers have been and gone, and we’ve (thanks, friends) spent weeks painting. (If you’ve ever painted raw plaster, you’ll know the first coat feels like trying to moisturise a Weet-Bix.)
The kitchen’s installed. The bathrooms are in. This is the part of the build where things start to feel real, like an actual home is forming, not just a concept on paper.
Over the years of working with builders, I’ve learned which upgrades are worth it, not because they look flash, but because they save stress, money, or maintenance later on.
Here’s where I spent smart (many of these tips can be used in tiny homes too):
-
Mid-range fittings – I’ve used ultra-cheap tapware before (hello, AliExpress) and ended up replacing it within months. This time I went mid-range with trusted brands, not the cheapest, not the fanciest, but reliable.
-
Upgraded front door and handles – These are the things you touch every day. If they feel cheap, the whole house feels cheap. Spending a little more here lifts the whole experience.
-
Tinted windows – A one-off cost that’ll keep the house cooler in summer (I’m north-facing and in a warm northland climate), which means lower power bills in winter and a more comfortable home.
-
The kitchen – Local quotes for a custom kitchen came in $6-7k higher than the flatpack I got from Mitre 10. Mine cost $9k including appliances, still looks modern, and most importantly didn’t chew through my budget.
-
Polished concrete floors – Because I planned for them early, they were cheaper than carpet. They’re easy-care, durable, and won’t need replacing in 7–10 years.
-
Simple roof and ceiling design – Fewer angles means lower build costs and better thermal performance.
-
Non-structural internal walls – I can change the layout in the future without consent. Flexibility like this adds long-term value without ongoing compliance headaches.
Here’s something I don’t hear talked about enough: most people pour everything into building their forever home first, then hope they can afford to invest later. I flipped that.
I’m calling it the Build-Backwards Strategy, and here’s how it worked for me:
-
I bought the land for $370,000, and the house fixed price build is $304,000
-
I had it professionally valued based on what it would be worth once the house was complete
-
That projected value came back at $735,000
-
Based on that, I was able to borrow $588,000, which covered the land and the full build
-
I put in $61,000 in cash, the rest of my equity came from the uplift in value
So instead of needing a giant deposit, I used valuation-based equity to make it work.
Once this first house is finished, I’ll get a new valuation done, first on the one-house setup, then again on the anticipated value with both houses complete. The bank will factor in that valuation and the income from the rental house and the two leased tiny house sites when they reassess my ability to service the loan for the second build. Together, those three income streams will eventually cover around 85% of my total mortgage (for both house builds and the land).
These houses I’m building? It’s not the kind of dream home you see on Instagram. But that’s not my dream anymore. My dream isn’t square metreage or walk-in wardrobes, it’s about financial stability, and the ability to live well and enjoy life now, not just someday, when I’m 65 and hoping there’s still a bit of gold leaf in retirement or a Lotto win around the corner. I want to travel. Breathe. Have options. Not just scrape by just existing.
What’s next:
The next chapter of this build? Water tanks, septic system, wastewater, and a whole lot of planning.
Because I’m not connected to council water or sewer, I’ve had to sort everything myself, tanks, filters, drainage fields, and all the extra costs. Let’s just say there’s some drama, some technical hurdles, because of course there is. That’s what I’ll be unpacking in Part 5.